At Glisshop, we offer a wide range of snowboard boots, with models designed by the best brands to match your skill level and riding style. Whether you’re a beginner, intermediate or expert rider, freerider, freestyler or are looking to ride groomers, we have a boot for you in our selection. This guide aims at helping you make the right choice among models with various flex, or levels of stiffness and multiple lacing systems.
Snowboard boot sizing guide
If you have never tried a snowboard boot before, the first time you do you may not know if the size is right. Between the length, the width, the liner closure, the boot closure or the lateral reinforcements, there are many things that can affect your fit and your feel.
Listen to Arnaud's tips on how to put on snowboard boots. He's telling you everything you need to know to make sure you pick something that suits you. Do not neglect them, they are an important part of your snowboard setup. They ensure comfort, precision and performance. A wrong boot or a boot that's not properly locked can truly ruin your day.
Key Points
- Determine your size in Mondo Point (cm) for a precise boot fit.
- Your toes should just brush the liner without excessive pressure, and your heel should remain firmly in place.
- Opt for a boot that feels slightly snug: the liner foam will compress by around 0.5 cm with use.
- Select the flex according to your riding style: soft for beginners or freestyle, stiff for freeride.
- The lacing system affects comfort: traditional laces for precision, Boa for speed, and hybrid systems for versatility.
- Check the compatibility between boots and bindings, especially for Step On and Clicker systems.
1st step: knowing your size thanks to a size conversion chart
The first thing you need to know is your size in Mondo Point. This scale is available on every box of boots, sneakers, shoes, etc. It is your foot size in centimetres. The size conversion chart below is a general guideline, sizes may differ from one brand to the other. Tips per model are available on our product sheets.
| Mondo (cm) | Men / Unisex (US) | Women (US) | Europe | UK |
|---|---|---|---|---|
| 15 | 8 (Kids') | - | 25 | 7 |
| 15.5 | 8 (Kids') | - | 25 | 7 |
| 16 | 9 (Kids') | - | 26 | 8 |
| 16.5 | 9 (Kids') | - | 26 | 8 |
| 17 | 10 (Kids') | - | 27 | 9 |
| 17.5 | 11 (Kids') | - | 28 | 10 |
| 18.5 | 12 (Kids') | - | 29 | 11 |
| 19.5 | 13 (Kids') | - | 30.5 | 12 |
| 20 | 13.5 (Kids') | - | 31 | 13 |
| 20.5 | 1 | - | 32 | 13.5 |
| 21 | 2 | - | 33 | 1 |
| 21.5 | 3 | - | 34 | 2 |
| 22 | 4 | 5 | 35 | 3 |
| 22.5 | 4.5 | 5.5 | 36 | 3.5 |
| 23 | 5 | 6 | 36.5 | 4 |
| 23.5 | 5.5 | 6.5 | 37 | 4.5 |
| 24 | 6 | 7 | 38 | 5 |
| 24.5 | 6.5 | 7.5 | 38.5 | 5.5 |
| 25 | 7 | 8 | 39 | 6 |
| 25.5 | 7.5 | 8.5 | 40 | 6.5 |
| 26 | 8 | 9 | 40.5 | 7 |
| 26.5 | 8.5 | 9.5 | 41 | 7.5 |
| 27 | 9 | 10 | 42 | 8 |
| 27.5 | 9.5 | 10.5 | 42.5 | 8.5 |
| 28 | 10 | 11 | 43 | 9 |
| 28.5 | 10.5 | 11.5 | 44 | 9.5 |
| 29 | 11 | 12 | 44.5 | 10 |
| 29.5 | 11.5 | - | 45 | 10.5 |
| 30 | 12 | - | 45.5 | 11 |
| 30.5 | 12.5 | - | 46 | 11.5 |
| 31 | 13 | - | 47 | 12 |
| 31.5 | 13.5 | - | 47.5 | 12.5 |
| 32 | 14 | - | 48 | 13 |
| 32.5 | 13.5 | - | 48.5 | 13.5 |
| 33 | 15 | - | 49 | 14 |
| 33.5 | 15.5 | - | 50 | 14.5 |
| 34 | 16 | - | 51 | 15 |
2nd step: try the liner's insole
Now that you know your Mondo Point size, you can pick a pair of snowboard boots matching it. Before you put them on, you can try to take out the insole and place your foot on. This will give you a first clue on how close you are to the right size. If your foot covers the sole entirely, you probably picked the correct size.
You can put the sole back into the liner, the liner back into the boot, and go to the next step, put on the boot!
3rd step: try the boots on
For this step, it is recommended to try the boots with your snowboard socks on. The idea is to be in a similar situation as when you are riding. Wearing good socks is actually very important and often forgotten. It will reduce friction and increase comfort.
When you're inside the boots, stand up for a more natural position, this will make the closure more efficient.
Do not trust your feel of fit when the boots are not closed. It's only when you've cranked up the whole closure system that your foot will position correctly. It will slide backwards, the heel will come in its right position and only then you can feel if the boot fits or not.
Let's see how to close boot now. Every of the following steps must be done while standing.
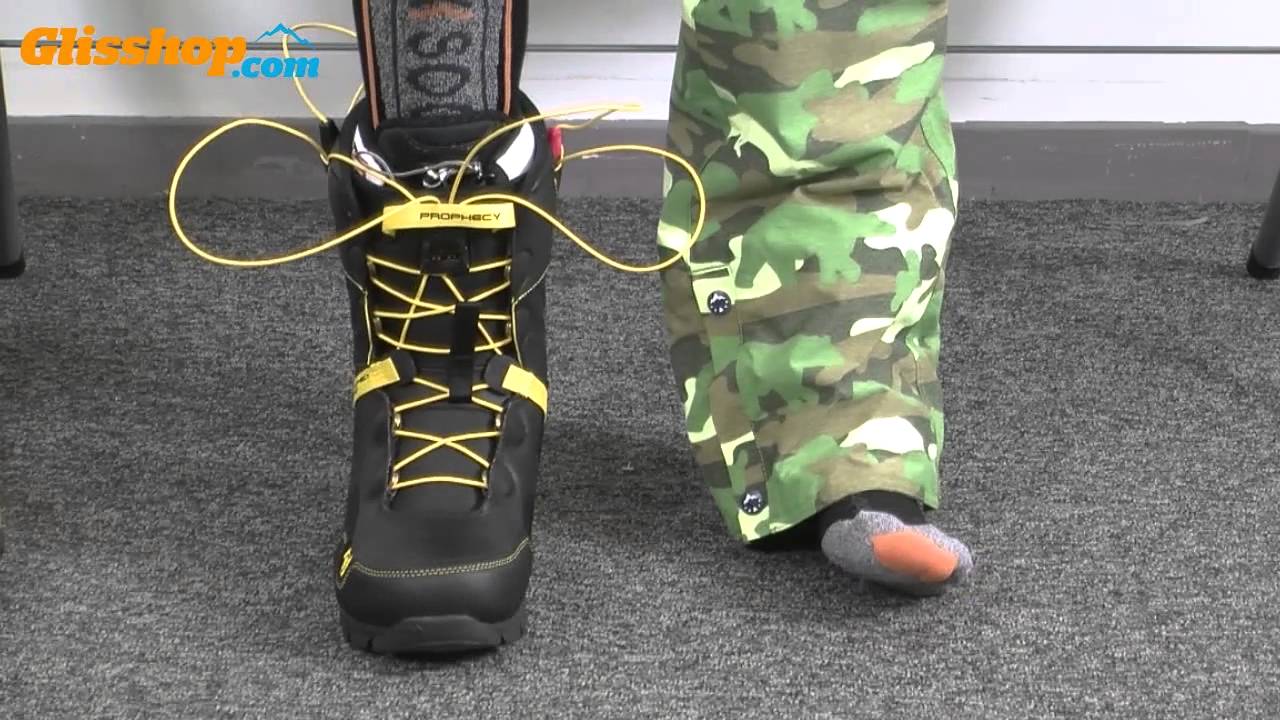
4th step: how to tie your boots?
Lacing up the liner
Before you tension the shell, you need to take care of the liner. No need to overtighten it, you won't get better support but, if it's too tight you may create pressure points. The idea is to tighten it just enough so that its wraps around your foot and fits well.
Lacing the shell
Once you have the liner securely fastened, you can take care of the outer shell. This time, make it tight! Whether your boot features a Boa, Speed Laces or traditional laces, pull it to the max as if you were going to ride. You should feel your foot sliding backwards with the heel settling into the heel pocket.
5th step: check if the size is right
Ideally, your should feel your toes gently touching the end of the liner. When you flex forward, your foot will slide backwards to give extra room to your toes. Make sure that your heel remains locked in. It shouldn't lift when you flex. If it does, you probably got the wrong size. Your foot is not held enough and that will cause friction when you're riding. Get one size down.
If your toes are still touching the end of the liner when you're flexing forward, but it doesn't feel uncomfortable or painful, if there's no pressure point and if you can still move your toes when your foot sits flat, then it shouldn't be a problem. Keep in mind that liner's foams pack out after some riding. In general, you get an extra 1/2 size. That's why it's always better to have a boot that feels slightly too tight (when it's new) than slightly too big.
Keep the boots on for like 10 or 15 minutes if you can. This will allow you to feel how they truly fit. The foam will have the time to adapt to your shapes and it'll give you a good idea of how you're going to feel in them.
In a nutshell:
Snowboard boot stiffness and flex
We divide snowboard boots according to three flex categories: soft, medium and stiff. The choice depends on your skill level and riding style. Novice riders need a pair of soft forgiving snowboard boot to progress at their own pace. On the other hand, expert snowboarders will appreciate the responsiveness provided by stiff models. During your snowboarding journey, you’ll progressively be able to try stiffer boots, going from a soft flex to medium then stiff, however you need to take your riding style into account as well. Freestyle riding requires more flexibility, notably at the cuff to better exploit your snowboard’s flex, while freeriding and carving need a stiffer boot, providing control, support and precision. For all-mountain riding, an intermediate flex offers a perfect balance and will perform on all terrains.
Traditional laces, speed laces, Boa, choosing the right lacing system
You'll find three main types of lacing systems on snowboard boots: traditional laces, speed laces and Boa technology. They all come with their own advantages and the choice primarily depends on personal preference. Traditional laces remain a benchmark as they offer precision and allow to adjust the tension on various areas, guaranteeing maximum comfort. Boots featuring traditional laces can also have a power strap at the top. The advantages of speed lacing systems are the simplicity, precision and speed or course, as the name suggests. The same goes for Boa systems which are very quick and easy to use. In both cases, a single zone lacing system which adjusts the tension on the entire boot epitomises simplicity. However, systems allowing to differentiate the tension on the top and bottom parts of the boot offer a more custom fit. You'll also find boots with a hybrid lacing system, combining traditional laces and Boa for a precise fit and perfect foot stability in the boot.
Can you walk in snowboard boots?
The answer is yes. Snowboard boots offer perfect comfort to walk in, for instance around the car park where you’ll be able to walk more naturally than our skier friends but also during short freeride approaches or simply to climb a short distance up the run up of a feature you’re sessioning with your mates. Snowboard boots are even compatible with numerous snowshoes if you have yet to make the switch to a splitboard set-up but still want to earn your turns. Some models can be used with crampons in case you need to climb steep or icy slopes during a backcountry session.
Binding compatibility
Generally speaking, snowboard boots and bindings are universally compatible with each other. You can mix and match brands, boots will be perfectly compatible with bindings. However, if you want to use Burton’s Step On system, you absolutely need boots and bindings that are compatible together. You can’t use Step On bindings without dedicated boots. The same goes for K2’s Clicker system which requires bindings and boots featuring this technology.