90513403
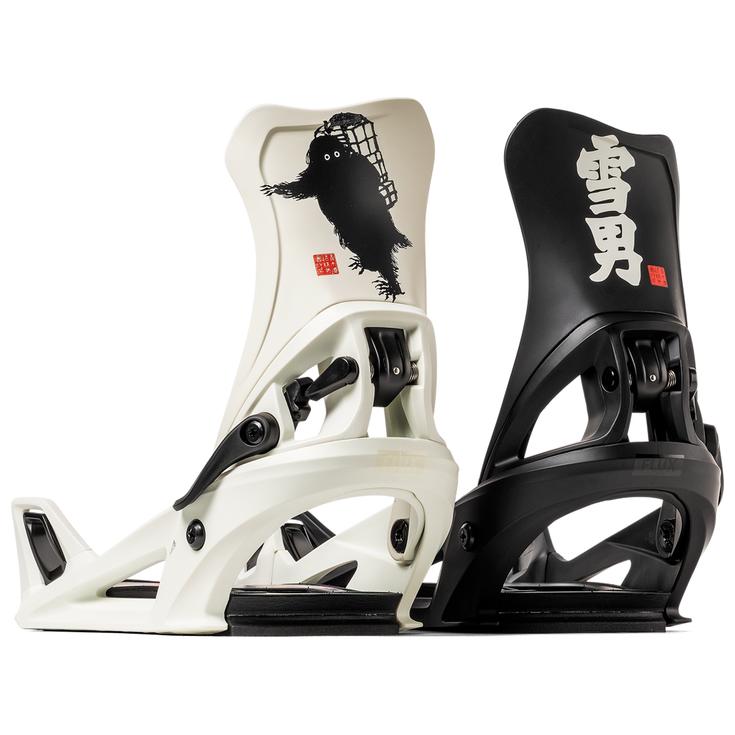
DS Step On Yukiotoko
https://www.glisshop.co.uk/snowboard-bindings/flux/ds-step-on-yukiotoko90513403
Flux
Men
Women
Winter 2027
90513403
The Flux DS Step On Yukiotoko snowboard binding offers quick entry and support tailored for versatile riding on all types of terrain.
https://glisshop-glisshop-fr-storage.omn.proximis.com/Imagestorage/imagesSynchro/0/0/7f266de730e993fa3369e355998f644fa1d5e916_H27FLUXBIN5592982_0.jpeg
https://glisshop-glisshop-fr-storage.omn.proximis.com/Imagestorage/imagesSynchro/0/0/66225359bc8b6488790df753d0592cfadef1eb87_H27FLUXBIN5592982_901.jpeg
https://glisshop-glisshop-fr-storage.omn.proximis.com/Imagestorage/imagesSynchro/0/0/a613409230dbf4f44ac0f1fc35b4a08b81fbb6d8_H27FLUXBIN5592982_902.jpeg
OutOfStock
334.36
GBP
334.36
GBP_VAT_royaume_uni
GBP_VAT_france
334.36
334.36
GBP
packs always have stock if there is a price
Unavailable
GBP_VAT_france_corse
334.36
334.36
GBP
packs always have stock if there is a price
Unavailable
GBP_VAT_espagne
337.14
334.36
GBP
packs always have stock if there is a price
Unavailable
GBP_VAT_italie
339.93
334.36
GBP
packs always have stock if there is a price
Unavailable
GBP_VAT_allemagne
331.57
334.36
GBP
packs always have stock if there is a price
Unavailable
GBP_VAT_pays_bas
337.14
334.36
GBP
packs always have stock if there is a price
Unavailable
GBP_VAT_belgique
337.14
334.36
GBP
packs always have stock if there is a price
Unavailable
GBP_VAT_suisse
301.2
334.36
GBP
packs always have stock if there is a price
Unavailable
GBP_VAT_suede
348.29
334.36
GBP
packs always have stock if there is a price
Unavailable
GBP_VAT_danemark
334.36
334.36
GBP
packs always have stock if there is a price
Unavailable
GBP_VAT_monaco
334.36
334.36
GBP
packs always have stock if there is a price
Unavailable
GBP_VAT_luxembourg
326
334.36
GBP
packs always have stock if there is a price
Unavailable
GBP_VAT_irlande
334.36
334.36
GBP
packs always have stock if there is a price
Unavailable
GBP_VAT_portugal
334.36
334.36
GBP
packs always have stock if there is a price
Unavailable
GBP_VAT_autriche
334.36
334.36
GBP
packs always have stock if there is a price
Unavailable
GBP_VAT_pologne
334.36
334.36
GBP
packs always have stock if there is a price
Unavailable
GBP_VAT_finlande
349.68
334.36
GBP
packs always have stock if there is a price
Unavailable
GBP_VAT_slovenie
334.36
334.36
GBP
packs always have stock if there is a price
Unavailable
GBP_VAT_france
334.36
334.36
GBP
packs always have stock if there is a price
Unavailable
GBP_VAT_france_corse
334.36
334.36
GBP
packs always have stock if there is a price
Unavailable
GBP_VAT_espagne
337.14
334.36
GBP
packs always have stock if there is a price
Unavailable
GBP_VAT_italie
339.93
334.36
GBP
packs always have stock if there is a price
Unavailable
GBP_VAT_allemagne
331.57
334.36
GBP
packs always have stock if there is a price
Unavailable
GBP_VAT_pays_bas
337.14
334.36
GBP
packs always have stock if there is a price
Unavailable
GBP_VAT_belgique
337.14
334.36
GBP
packs always have stock if there is a price
Unavailable
GBP_VAT_suisse
301.2
334.36
GBP
packs always have stock if there is a price
Unavailable
GBP_VAT_suede
348.29
334.36
GBP
packs always have stock if there is a price
Unavailable
GBP_VAT_danemark
334.36
334.36
GBP
packs always have stock if there is a price
Unavailable
GBP_VAT_monaco
334.36
334.36
GBP
packs always have stock if there is a price
Unavailable
GBP_VAT_luxembourg
326
334.36
GBP
packs always have stock if there is a price
Unavailable
GBP_VAT_irlande
334.36
334.36
GBP
packs always have stock if there is a price
Unavailable
GBP_VAT_portugal
334.36
334.36
GBP
packs always have stock if there is a price
Unavailable
GBP_VAT_autriche
334.36
334.36
GBP
packs always have stock if there is a price
Unavailable
GBP_VAT_pologne
334.36
334.36
GBP
packs always have stock if there is a price
Unavailable
GBP_VAT_finlande
349.68
334.36
GBP
packs always have stock if there is a price
Unavailable
GBP_VAT_slovenie
334.36
334.36
GBP
packs always have stock if there is a price
Unavailable
CHF_VAT_france
364.75
364.75
CHF
packs always have stock if there is a price
Unavailable
CHF_VAT_france_corse
364.75
364.75
CHF
packs always have stock if there is a price
Unavailable
CHF_VAT_royaume_uni
364.75
364.75
CHF
packs always have stock if there is a price
Unavailable
CHF_VAT_espagne
367.79
364.75
CHF
packs always have stock if there is a price
Unavailable
CHF_VAT_italie
370.83
364.75
CHF
packs always have stock if there is a price
Unavailable
CHF_VAT_allemagne
361.71
364.75
CHF
packs always have stock if there is a price
Unavailable
CHF_VAT_pays_bas
367.79
364.75
CHF
packs always have stock if there is a price
Unavailable
CHF_VAT_belgique
367.79
364.75
CHF
packs always have stock if there is a price
Unavailable
CHF_VAT_suisse
328.58
364.75
CHF
packs always have stock if there is a price
Unavailable
CHF_VAT_suede
379.95
364.75
CHF
packs always have stock if there is a price
Unavailable
CHF_VAT_danemark
364.75
364.75
CHF
packs always have stock if there is a price
Unavailable
CHF_VAT_monaco
364.75
364.75
CHF
packs always have stock if there is a price
Unavailable
CHF_VAT_luxembourg
355.63
364.75
CHF
packs always have stock if there is a price
Unavailable
CHF_VAT_irlande
364.75
364.75
CHF
packs always have stock if there is a price
Unavailable
CHF_VAT_portugal
364.75
364.75
CHF
packs always have stock if there is a price
Unavailable
CHF_VAT_autriche
364.75
364.75
CHF
packs always have stock if there is a price
Unavailable
CHF_VAT_pologne
364.75
364.75
CHF
packs always have stock if there is a price
Unavailable
CHF_VAT_finlande
381.47
364.75
CHF
packs always have stock if there is a price
Unavailable
CHF_VAT_slovenie
364.75
364.75
CHF
packs always have stock if there is a price
Unavailable
CHF_VAT_france
364.75
364.75
CHF
packs always have stock if there is a price
Unavailable
CHF_VAT_france_corse
364.75
364.75
CHF
packs always have stock if there is a price
Unavailable
CHF_VAT_royaume_uni
364.75
364.75
CHF
packs always have stock if there is a price
Unavailable
CHF_VAT_espagne
367.79
364.75
CHF
packs always have stock if there is a price
Unavailable
CHF_VAT_italie
370.83
364.75
CHF
packs always have stock if there is a price
Unavailable
CHF_VAT_allemagne
361.71
364.75
CHF
packs always have stock if there is a price
Unavailable
CHF_VAT_pays_bas
367.79
364.75
CHF
packs always have stock if there is a price
Unavailable
CHF_VAT_belgique
367.79
364.75
CHF
packs always have stock if there is a price
Unavailable
CHF_VAT_suisse
328.58
364.75
CHF
packs always have stock if there is a price
Unavailable
CHF_VAT_suede
379.95
364.75
CHF
packs always have stock if there is a price
Unavailable
CHF_VAT_danemark
364.75
364.75
CHF
packs always have stock if there is a price
Unavailable
CHF_VAT_monaco
364.75
364.75
CHF
packs always have stock if there is a price
Unavailable
CHF_VAT_luxembourg
355.63
364.75
CHF
packs always have stock if there is a price
Unavailable
CHF_VAT_irlande
364.75
364.75
CHF
packs always have stock if there is a price
Unavailable
CHF_VAT_portugal
364.75
364.75
CHF
packs always have stock if there is a price
Unavailable
CHF_VAT_autriche
364.75
364.75
CHF
packs always have stock if there is a price
Unavailable
CHF_VAT_pologne
364.75
364.75
CHF
packs always have stock if there is a price
Unavailable
CHF_VAT_finlande
381.47
364.75
CHF
packs always have stock if there is a price
Unavailable
CHF_VAT_slovenie
364.75
364.75
CHF
packs always have stock if there is a price
Unavailable
EUR_VAT_france
379.95
379.95
EUR
packs always have stock if there is a price
Unavailable
EUR_VAT_france_corse
379.95
379.95
EUR
packs always have stock if there is a price
Unavailable
EUR_VAT_royaume_uni
379.95
379.95
EUR
packs always have stock if there is a price
Unavailable
EUR_VAT_espagne
383.12
379.95
EUR
packs always have stock if there is a price
Unavailable
EUR_VAT_italie
386.28
379.95
EUR
packs always have stock if there is a price
Unavailable
EUR_VAT_allemagne
376.78
379.95
EUR
packs always have stock if there is a price
Unavailable
EUR_VAT_pays_bas
383.12
379.95
EUR
packs always have stock if there is a price
Unavailable
EUR_VAT_belgique
383.12
379.95
EUR
packs always have stock if there is a price
Unavailable
EUR_VAT_suisse
342.27
379.95
EUR
packs always have stock if there is a price
Unavailable
EUR_VAT_suede
395.78
379.95
EUR
packs always have stock if there is a price
Unavailable
EUR_VAT_danemark
379.95
379.95
EUR
packs always have stock if there is a price
Unavailable
EUR_VAT_monaco
379.95
379.95
EUR
packs always have stock if there is a price
Unavailable
EUR_VAT_luxembourg
370.45
379.95
EUR
packs always have stock if there is a price
Unavailable
EUR_VAT_irlande
379.95
379.95
EUR
packs always have stock if there is a price
Unavailable
EUR_VAT_portugal
379.95
379.95
EUR
packs always have stock if there is a price
Unavailable
EUR_VAT_autriche
379.95
379.95
EUR
packs always have stock if there is a price
Unavailable
EUR_VAT_pologne
379.95
379.95
EUR
packs always have stock if there is a price
Unavailable
EUR_VAT_finlande
397.36
379.95
EUR
packs always have stock if there is a price
Unavailable
EUR_VAT_slovenie
379.95
379.95
EUR
packs always have stock if there is a price
Unavailable
EUR_VAT_france
379.95
379.95
EUR
packs always have stock if there is a price
Unavailable
EUR_VAT_france_corse
379.95
379.95
EUR
packs always have stock if there is a price
Unavailable
EUR_VAT_royaume_uni
379.95
379.95
EUR
packs always have stock if there is a price
Unavailable
EUR_VAT_espagne
383.12
379.95
EUR
packs always have stock if there is a price
Unavailable
EUR_VAT_italie
386.28
379.95
EUR
packs always have stock if there is a price
Unavailable
EUR_VAT_allemagne
376.78
379.95
EUR
packs always have stock if there is a price
Unavailable
EUR_VAT_pays_bas
383.12
379.95
EUR
packs always have stock if there is a price
Unavailable
EUR_VAT_belgique
383.12
379.95
EUR
packs always have stock if there is a price
Unavailable
EUR_VAT_suisse
342.27
379.95
EUR
packs always have stock if there is a price
Unavailable
EUR_VAT_suede
395.78
379.95
EUR
packs always have stock if there is a price
Unavailable
EUR_VAT_danemark
379.95
379.95
EUR
packs always have stock if there is a price
Unavailable
EUR_VAT_monaco
379.95
379.95
EUR
packs always have stock if there is a price
Unavailable
EUR_VAT_luxembourg
370.45
379.95
EUR
packs always have stock if there is a price
Unavailable
EUR_VAT_irlande
379.95
379.95
EUR
packs always have stock if there is a price
Unavailable
EUR_VAT_portugal
379.95
379.95
EUR
packs always have stock if there is a price
Unavailable
EUR_VAT_autriche
379.95
379.95
EUR
packs always have stock if there is a price
Unavailable
EUR_VAT_pologne
379.95
379.95
EUR
packs always have stock if there is a price
Unavailable
EUR_VAT_finlande
397.36
379.95
EUR
packs always have stock if there is a price
Unavailable
EUR_VAT_slovenie
379.95
379.95
EUR
packs always have stock if there is a price
Unavailable
/Snowboard/Snowboard bindings
brand - 50338925
109046 - GLIS_CHAR_SNOW_BINDING_ENTRY_SYSTEM_10053
109047 - GLIS_CHAR_SNOW_BINDING_CATEGORY_10061
211232 - 1
107027 - GLIS_NAME_TYPO_PRODUCT_26
211236 - GLIS_PROD_HIGHLIGHT_SEASON_42074
21127769 - 21127765
21127769 - 21127766