88462744
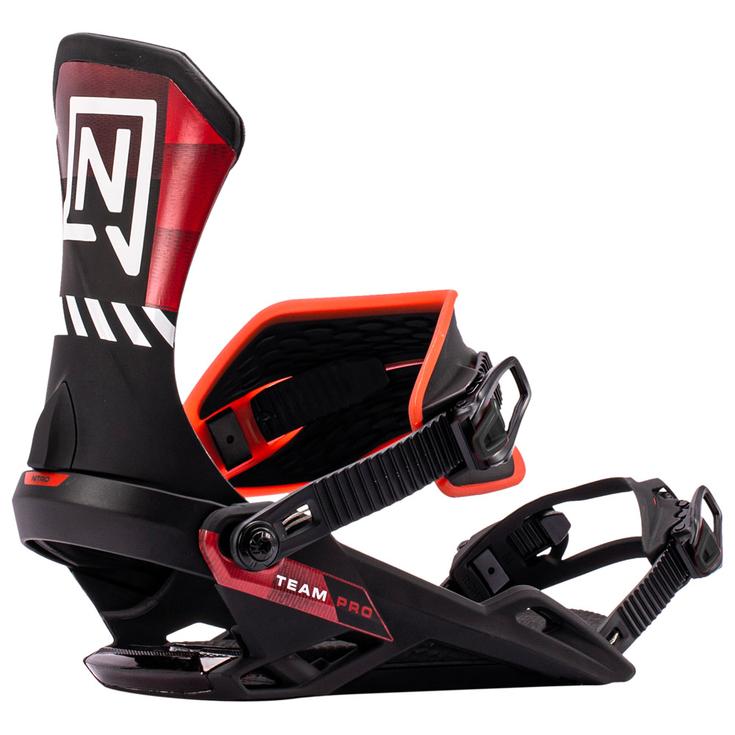
Team Pro Black Red
https://www.glisshop.co.uk/snowboard-bindings/nitro/team-pro-black-red88462744
Nitro
Men
Winter 2027
88462744
The Nitro Team Pro Black Red snowboard binding offers control and versatility for intense riding on all types of terrain.
https://glisshop-glisshop-fr-storage.omn.proximis.com/Imagestorage/imagesSynchro/0/0/d738daa896bf6965eef226b581cc03b2cae29f58_H27NITRBIN5584647_0.jpeg
https://glisshop-glisshop-fr-storage.omn.proximis.com/Imagestorage/imagesSynchro/0/0/8b082b90542e44991625d8d1a846a7b2eb934665_H27NITRBIN5584647_2.jpeg
https://glisshop-glisshop-fr-storage.omn.proximis.com/Imagestorage/imagesSynchro/0/0/07ffa76d37f6cdf533f136597485bb86973cea0e_H27NITRBIN5584647_6.jpeg
https://glisshop-glisshop-fr-storage.omn.proximis.com/Imagestorage/imagesSynchro/0/0/94b089c8b63f78ee44768e84125f7b04cc3d0935_H27NITRBIN5584647_901.jpeg
InStock
316.71
GBP
316.71
GBP_VAT_royaume_uni
GBP_VAT_france
316.71
316.71
GBP
packs always have stock if there is a price
InStock
GBP_VAT_france_corse
316.71
316.71
GBP
packs always have stock if there is a price
InStock
GBP_VAT_espagne
319.35
316.71
GBP
packs always have stock if there is a price
InStock
GBP_VAT_italie
321.99
316.71
GBP
packs always have stock if there is a price
InStock
GBP_VAT_allemagne
314.07
316.71
GBP
packs always have stock if there is a price
InStock
GBP_VAT_pays_bas
319.35
316.71
GBP
packs always have stock if there is a price
InStock
GBP_VAT_belgique
319.35
316.71
GBP
packs always have stock if there is a price
InStock
GBP_VAT_suisse
285.3
316.71
GBP
packs always have stock if there is a price
InStock
GBP_VAT_suede
329.91
316.71
GBP
packs always have stock if there is a price
InStock
GBP_VAT_danemark
316.71
316.71
GBP
packs always have stock if there is a price
InStock
GBP_VAT_monaco
316.71
316.71
GBP
packs always have stock if there is a price
InStock
GBP_VAT_luxembourg
308.79
316.71
GBP
packs always have stock if there is a price
InStock
GBP_VAT_irlande
316.71
316.71
GBP
packs always have stock if there is a price
InStock
GBP_VAT_portugal
316.71
316.71
GBP
packs always have stock if there is a price
InStock
GBP_VAT_autriche
316.71
316.71
GBP
packs always have stock if there is a price
InStock
GBP_VAT_pologne
316.71
316.71
GBP
packs always have stock if there is a price
InStock
GBP_VAT_finlande
331.23
316.71
GBP
packs always have stock if there is a price
InStock
GBP_VAT_slovenie
316.71
316.71
GBP
packs always have stock if there is a price
InStock
GBP_VAT_france
316.71
316.71
GBP
packs always have stock if there is a price
InStock
GBP_VAT_france_corse
316.71
316.71
GBP
packs always have stock if there is a price
InStock
GBP_VAT_espagne
319.35
316.71
GBP
packs always have stock if there is a price
InStock
GBP_VAT_italie
321.99
316.71
GBP
packs always have stock if there is a price
InStock
GBP_VAT_allemagne
314.07
316.71
GBP
packs always have stock if there is a price
InStock
GBP_VAT_pays_bas
319.35
316.71
GBP
packs always have stock if there is a price
InStock
GBP_VAT_belgique
319.35
316.71
GBP
packs always have stock if there is a price
InStock
GBP_VAT_suisse
285.3
316.71
GBP
packs always have stock if there is a price
InStock
GBP_VAT_suede
329.91
316.71
GBP
packs always have stock if there is a price
InStock
GBP_VAT_danemark
316.71
316.71
GBP
packs always have stock if there is a price
InStock
GBP_VAT_monaco
316.71
316.71
GBP
packs always have stock if there is a price
InStock
GBP_VAT_luxembourg
308.79
316.71
GBP
packs always have stock if there is a price
InStock
GBP_VAT_irlande
316.71
316.71
GBP
packs always have stock if there is a price
InStock
GBP_VAT_portugal
316.71
316.71
GBP
packs always have stock if there is a price
InStock
GBP_VAT_autriche
316.71
316.71
GBP
packs always have stock if there is a price
InStock
GBP_VAT_pologne
316.71
316.71
GBP
packs always have stock if there is a price
InStock
GBP_VAT_finlande
331.23
316.71
GBP
packs always have stock if there is a price
InStock
GBP_VAT_slovenie
316.71
316.71
GBP
packs always have stock if there is a price
InStock
CHF_VAT_france
345.5
345.5
CHF
packs always have stock if there is a price
InStock
CHF_VAT_france_corse
345.5
345.5
CHF
packs always have stock if there is a price
InStock
CHF_VAT_royaume_uni
345.5
345.5
CHF
packs always have stock if there is a price
InStock
CHF_VAT_espagne
348.38
345.5
CHF
packs always have stock if there is a price
InStock
CHF_VAT_italie
351.26
345.5
CHF
packs always have stock if there is a price
InStock
CHF_VAT_allemagne
342.62
345.5
CHF
packs always have stock if there is a price
InStock
CHF_VAT_pays_bas
348.38
345.5
CHF
packs always have stock if there is a price
InStock
CHF_VAT_belgique
348.38
345.5
CHF
packs always have stock if there is a price
InStock
CHF_VAT_suisse
311.24
345.5
CHF
packs always have stock if there is a price
InStock
CHF_VAT_suede
359.9
345.5
CHF
packs always have stock if there is a price
InStock
CHF_VAT_danemark
345.5
345.5
CHF
packs always have stock if there is a price
InStock
CHF_VAT_monaco
345.5
345.5
CHF
packs always have stock if there is a price
InStock
CHF_VAT_luxembourg
336.87
345.5
CHF
packs always have stock if there is a price
InStock
CHF_VAT_irlande
345.5
345.5
CHF
packs always have stock if there is a price
InStock
CHF_VAT_portugal
345.5
345.5
CHF
packs always have stock if there is a price
InStock
CHF_VAT_autriche
345.5
345.5
CHF
packs always have stock if there is a price
InStock
CHF_VAT_pologne
345.5
345.5
CHF
packs always have stock if there is a price
InStock
CHF_VAT_finlande
361.34
345.5
CHF
packs always have stock if there is a price
InStock
CHF_VAT_slovenie
345.5
345.5
CHF
packs always have stock if there is a price
InStock
CHF_VAT_france
345.5
345.5
CHF
packs always have stock if there is a price
InStock
CHF_VAT_france_corse
345.5
345.5
CHF
packs always have stock if there is a price
InStock
CHF_VAT_royaume_uni
345.5
345.5
CHF
packs always have stock if there is a price
InStock
CHF_VAT_espagne
348.38
345.5
CHF
packs always have stock if there is a price
InStock
CHF_VAT_italie
351.26
345.5
CHF
packs always have stock if there is a price
InStock
CHF_VAT_allemagne
342.62
345.5
CHF
packs always have stock if there is a price
InStock
CHF_VAT_pays_bas
348.38
345.5
CHF
packs always have stock if there is a price
InStock
CHF_VAT_belgique
348.38
345.5
CHF
packs always have stock if there is a price
InStock
CHF_VAT_suisse
311.24
345.5
CHF
packs always have stock if there is a price
InStock
CHF_VAT_suede
359.9
345.5
CHF
packs always have stock if there is a price
InStock
CHF_VAT_danemark
345.5
345.5
CHF
packs always have stock if there is a price
InStock
CHF_VAT_monaco
345.5
345.5
CHF
packs always have stock if there is a price
InStock
CHF_VAT_luxembourg
336.87
345.5
CHF
packs always have stock if there is a price
InStock
CHF_VAT_irlande
345.5
345.5
CHF
packs always have stock if there is a price
InStock
CHF_VAT_portugal
345.5
345.5
CHF
packs always have stock if there is a price
InStock
CHF_VAT_autriche
345.5
345.5
CHF
packs always have stock if there is a price
InStock
CHF_VAT_pologne
345.5
345.5
CHF
packs always have stock if there is a price
InStock
CHF_VAT_finlande
361.34
345.5
CHF
packs always have stock if there is a price
InStock
CHF_VAT_slovenie
345.5
345.5
CHF
packs always have stock if there is a price
InStock
EUR_VAT_france
359.9
359.9
EUR
packs always have stock if there is a price
InStock
EUR_VAT_france_corse
359.9
359.9
EUR
packs always have stock if there is a price
InStock
EUR_VAT_royaume_uni
359.9
359.9
EUR
packs always have stock if there is a price
InStock
EUR_VAT_espagne
362.9
359.9
EUR
packs always have stock if there is a price
InStock
EUR_VAT_italie
365.9
359.9
EUR
packs always have stock if there is a price
InStock
EUR_VAT_allemagne
356.9
359.9
EUR
packs always have stock if there is a price
InStock
EUR_VAT_pays_bas
362.9
359.9
EUR
packs always have stock if there is a price
InStock
EUR_VAT_belgique
362.9
359.9
EUR
packs always have stock if there is a price
InStock
EUR_VAT_suisse
324.21
359.9
EUR
packs always have stock if there is a price
InStock
EUR_VAT_suede
374.9
359.9
EUR
packs always have stock if there is a price
InStock
EUR_VAT_danemark
359.9
359.9
EUR
packs always have stock if there is a price
InStock
EUR_VAT_monaco
359.9
359.9
EUR
packs always have stock if there is a price
InStock
EUR_VAT_luxembourg
350.9
359.9
EUR
packs always have stock if there is a price
InStock
EUR_VAT_irlande
359.9
359.9
EUR
packs always have stock if there is a price
InStock
EUR_VAT_portugal
359.9
359.9
EUR
packs always have stock if there is a price
InStock
EUR_VAT_autriche
359.9
359.9
EUR
packs always have stock if there is a price
InStock
EUR_VAT_pologne
359.9
359.9
EUR
packs always have stock if there is a price
InStock
EUR_VAT_finlande
376.4
359.9
EUR
packs always have stock if there is a price
InStock
EUR_VAT_slovenie
359.9
359.9
EUR
packs always have stock if there is a price
InStock
EUR_VAT_france
359.9
359.9
EUR
packs always have stock if there is a price
InStock
EUR_VAT_france_corse
359.9
359.9
EUR
packs always have stock if there is a price
InStock
EUR_VAT_royaume_uni
359.9
359.9
EUR
packs always have stock if there is a price
InStock
EUR_VAT_espagne
362.9
359.9
EUR
packs always have stock if there is a price
InStock
EUR_VAT_italie
365.9
359.9
EUR
packs always have stock if there is a price
InStock
EUR_VAT_allemagne
356.9
359.9
EUR
packs always have stock if there is a price
InStock
EUR_VAT_pays_bas
362.9
359.9
EUR
packs always have stock if there is a price
InStock
EUR_VAT_belgique
362.9
359.9
EUR
packs always have stock if there is a price
InStock
EUR_VAT_suisse
324.21
359.9
EUR
packs always have stock if there is a price
InStock
EUR_VAT_suede
374.9
359.9
EUR
packs always have stock if there is a price
InStock
EUR_VAT_danemark
359.9
359.9
EUR
packs always have stock if there is a price
InStock
EUR_VAT_monaco
359.9
359.9
EUR
packs always have stock if there is a price
InStock
EUR_VAT_luxembourg
350.9
359.9
EUR
packs always have stock if there is a price
InStock
EUR_VAT_irlande
359.9
359.9
EUR
packs always have stock if there is a price
InStock
EUR_VAT_portugal
359.9
359.9
EUR
packs always have stock if there is a price
InStock
EUR_VAT_autriche
359.9
359.9
EUR
packs always have stock if there is a price
InStock
EUR_VAT_pologne
359.9
359.9
EUR
packs always have stock if there is a price
InStock
EUR_VAT_finlande
376.4
359.9
EUR
packs always have stock if there is a price
InStock
EUR_VAT_slovenie
359.9
359.9
EUR
packs always have stock if there is a price
InStock
/Snowboard/Snowboard bindings
brand - 121716
109046 - GLIS_CHAR_SNOW_BINDING_ENTRY_SYSTEM_10055
109047 - GLIS_CHAR_SNOW_BINDING_CATEGORY_10061
211232 - 1
107027 - GLIS_NAME_TYPO_PRODUCT_26
211236 - GLIS_PROD_HIGHLIGHT_SEASON_42074
21127769 - 21127765